System Utilities Menu - WM8
This menu contains several options that can improve your efficiency with IWMS and also decrease, through automation and mass imports, the time required to set up IWMS.
Furthermore, there are several options that give you control over the information that is presented on the Web portion of IWMS.
These programs prompt you for a warehouse, and then imports all the areas and locations from that warehouse into the IWMS system. These tools are useful, and can save you a lot of time, if you already have areas and locations set up.
In order to import warehouse information the warehouse must first be established in IWMS. For more information on establishing warehouses in IWMS, refer to System Utilities Menu - WM8.
- Access IWMS menu WM 8 - IWMS System Utilities Menu.
- Select one of the following options:
- Option 1 - Import Current Loc to IWMS Loc - Use this one to import locations.
- Option 2 - Import Current Areas to IWMS Area - Use this option to import areas.
- The process for importing locations and areas is essentially the same. In this example, areas are being imported.
- The first (and only) screen to appear prompts you for a warehouse.
- Enter the warehouse code you want to import the areas into IWMS. The warehouse must be established in the core system.
- Press Enter to send the area information over to IWMS. The system automatically returns you to the menu (WM1).
- To see if the areas transferred over correctly, access menu WM 1 - IWMS Physical Warehouse Setup Files and select option 2 - Areas File.
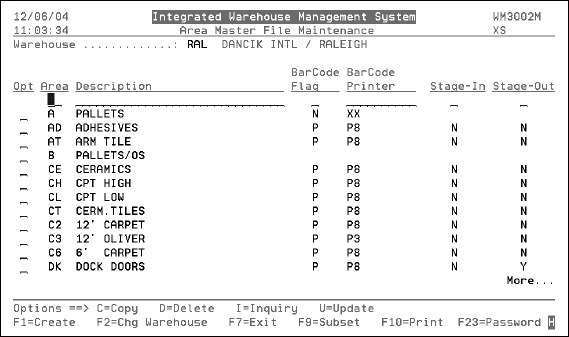
- The Area Master File Maintenance screen appears.
- To change the warehouse, and display all the warehouses that have areas established in IWMS, press F2.
Note: To check locations, use option 7 - Location File.
Set-up and other parts of the System that affect Email Triggers
Email Trigger for Wrong Dock Door
Event Trigger for Zero Pick to Show Reason Code
IWMS can be set-up to alert you when the following events happen:
- When the wrong dock door is scanned The event trigger, BADDOCKSCN, validates the scanned barcode for the dock door or trailer against the routing data on the order. If there is a difference between the actual scanned dock door and the routing information contained on the order an email is sent out. For more information, refer to Sending an Email when the Wrong Dock Door is Scanned.
- A Large Inventory Adjustment has been made (BIGINVADJ). This trigger is set when an inventory adjustment made is larger than the dollar amount entered in the IWMS warehouse master file. The goal is to monitor for unusual activity and warn the appropriate people.
- Negative Available Inventory Situation (NEGAVLINV) - This trigger is set when the available quantity is less than what is onhand for a serial#/location. In this scenario, there is still an on-hand quantity, but there are allocations which are more than what is on-hand. The goal is to inform someone so the allocation can be swapped or so a customer can be informed before the required ship that there is an issue.
- Negative On Hand Inventory Situation (NEGONHAND) - This trigger is set when the on-hand quantity of an item/serial#/location goes negative. The goal is to inform Inventory Control so they can investigate the situation as soon as possible
- Set the Serial# status via RF (SERIALSTS) - This trigger is set when the operator assigns a serial# status from the RF unit. The goal is to speed up the time frame from when the operator sees something unusual to when the Inventory Control people come to investigate it.
- Whenever a pick/task is dropped from directed picking (DRPDIRPCK).
- The trigger WRNGPRDDAT sends out an email whenever an order is scanned at the dock door and the production date does not match today's date. The dock door setting Production Date needs to be activated for this event trigger to take effect.
- When a quantity is adjusted, Event triggers RECVADJUST and are ALLPUTAWAY checked for email addresses.
- The event trigger CRDHLDDOCK can be used to send an email if a credit held order is moved to a Dock Door.
- The triggers ZEROPCKLOC and ZEROPICK are used to add recipients to a zero pick email. For more information, refer to Event Trigger for Zero Pick to Show Reason Code.
-
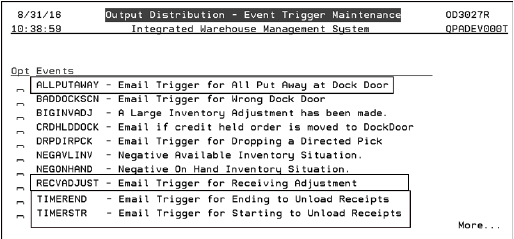
Four triggers related to inbound dock doors are found on the Event Trigger Maintenance window.
-
These event triggers work in conjunction with the RF menu options that allow you to adjust receipts (new function on PutAway option RF option 2) and start and stop the unloading timer (RF menu options 84 and 85).
-
These settings automatically send an email to your specified recipients when certain events associated with inbound dock doors occur.
-
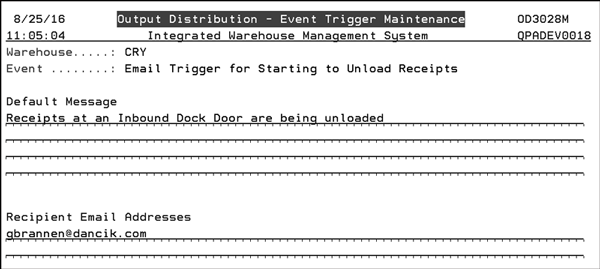
For example, the system can be set up to alert personnel when a truck at an inbound dock door is starting to be unloaded.
-
Enter an X to select one of the new triggers. On the screen that appears, enter a default message line and the email recipients.
Set-up and other parts of the System that affect Email Triggers
- For the trigger BIGINVADJ, enter the dollar amount to trigger the email in Trigger an email when an adjustment made has a value larger than... field on screen 3 of the Warehouse Settings (WM2 1).
- Also on screen 3 of the Warehouse Settings (WM2 1), the F9=Additional Status Options function key allows you to select items/inventory to include or omit from being considered from the email. If you include codes, only those codes are considered. If you omit codes, all codes except those omitted are considered. This include/omit functionality does not pertain to all the email triggers.
- ODS must be functional on the iSeries and the iSeries must be setup to send emails.
- For the event trigger BADDOCKSCN:
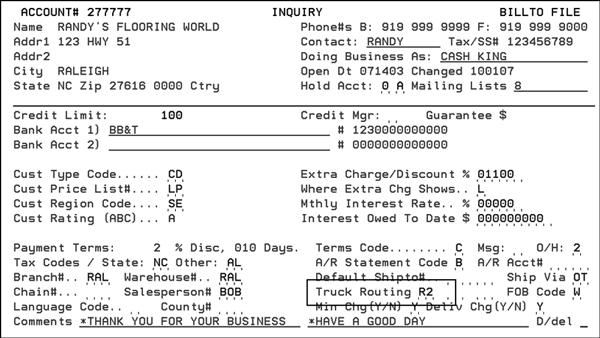
- Truck routes must be assigned to customers via the Truck Routing field in the Billto File.
- Dock doors are assigned to routes via the Dock Door Outbound Assignment (WM1 8) menu option.
- This event trigger works in conjunction with RF menu options: Build Pallet, Pick Confirm, and Move/Sts Change
Using the IWMS Event Triggers
1. Go to Menu WM8 and select option 20.
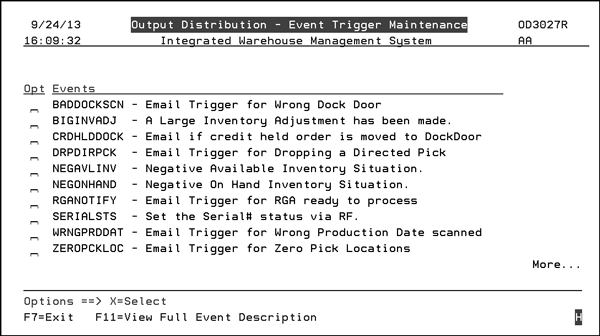
2. Select a trigger by entering an X in the appropriate Opt column.
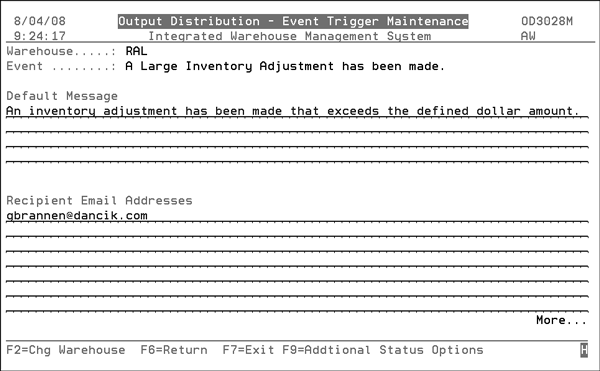
3. When you enter a message and e-mail addresses, the trigger is automatically activated.
Email Trigger for Wrong Dock Door
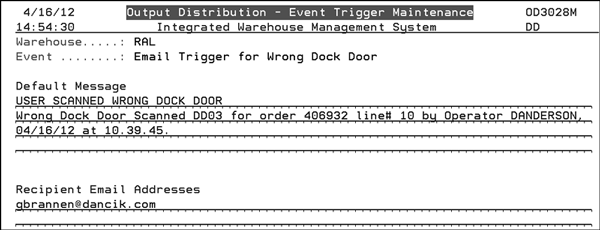
This event trigger, BADDOCKSCN, validates the scanned barcode for the dock door or trailer against the routing data on the order. If there is a difference between the actual scanned dock door and the routing information contained on the order an email is sent out.
Sending an Email when the Wrong Dock Door is Scanned
Set-up and Associated Files
Order Entry
Routes are displayed during order entry.

Billto File (FIL 1)
Routes are assigned to customer accounts via the Truck Routing field.
Dock Door Outbound Assignment (WM1 8)
Use this option to assign dock doors to routes.
- Enter a X for a dock door
- Select Truck Routes

IWMS Event Triggers (WM8 20)
Select the event trigger BADDOCKSCN to add a default message and email recipients.
Sending an Email when the Wrong Dock Door is Scanned
1. This functionality works in conjunction with RF menu options:
- Option 4 - Build Pallet
- Option 6 - Pick Confirm
- Option 7 - Move/Sts Change
2. When one of these option is used and a dock door is scanned that does not correspond to the information on the order, a message is displayed on the screen...
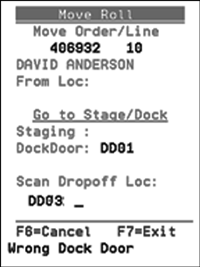
....and an email is sent to the recipients designated under the event trigger BADDOCKSCN.

Event Trigger for Zero Pick to Show Reason Code
Zero Pick is a function of IWMS that allows users to tell the system they cannot fill an order line because there may not be enough material in the location, material is broken, etc. The system then sends out an email letting the appropriate people know that the order cannot be filled from the current location.
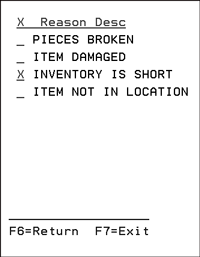
This functionality gives the operator a way to choose the reason the order could not be filled from the current location as well as adding that reason to the email event triggers.
Set-up
Warehouse Settings File (WM2 1)
This functionality has to be activated via the Show Zero Pick Reason on Event Triggers setting on the Zero Picking settings page.

Zero Pick Reason Codes Table (WM8 108)
Use this table to create and maintain the reasons why zero picks occur. These are the reason codes that are inlcuded on the zero pick triggered emails.
To add a new zero pick reason code, simply type it and it's description in.

Sending an Email for a Zero Pick that Includes a Reason Code
- After the set-up and activation has been performed, access the RF menu (menu options WM5 1 or WAR 21) and select option 4 - Build Pallet or 6 - Pick Confirm. In this example, option 6 was selected.
- Scan or enter the order and line number.
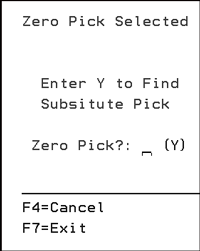
- If the order cannot be filled from the current location, the operator can press F20 (Shift + F8) to access the Zero Pick screen.
- Enter a Y to access and select a reason code.
- When Enter is pressed the system recognizes that a zero pick was performed and an email is sent out to the recipients specified in the ZEROPCKLOC and ZEROPICK triggers set up in WM8 20.
These options accessed via options 32 and 33 on the IWMS System Utilities Menu (WM8) allow you to quickly and easily apply putaway and picking sequences to a range of locations.
Putaway and picking sequences establish location priority and are required for IWMS' directed putaway/picking to function properly.
1. On IWMS System Utilities Menu, select option 32 - Mass Apply Location Putaway Seq or option 33 - Mass Apply Location Picking Seq.
In this example, option 32 - Mass Apply Location Putaway Seq was selected. The screen that appears, shown below, is the same for both options.
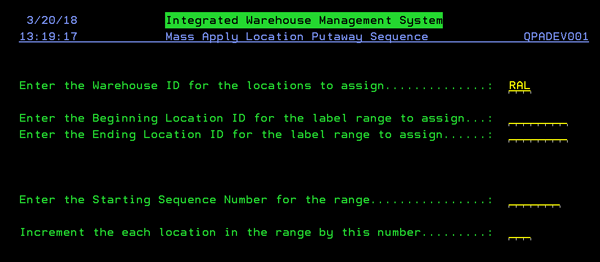
| Field | Description |
|
Enter the Beginning Location ID for the label range to assign
Enter the Ending Location ID for the label range to assign... |
Enter the beginning and ending location ranges for this putaway/picking sequence. For example, an entry of Rack1 to Rack 55 could cover your rolled goods locations while a range similar to AA1A to Z999 might cover pallet locations. Any location between the starting and ending location range will have a sequence number assigned. |
| Enter the Starting Sequence Number for the range | The number entered here is where the putaway/picking sequence numbers begin. The location assigned this sequence number will have the highest priority within directed putaway/picking. |
| Increment the each location in the range by this number | This is the value added to each successive location within the range. For example, if the sequence starts at 1 and a 1 is entered here, the next location in the range will have a putaway/picking sequence of 2. |
Consider the following example.
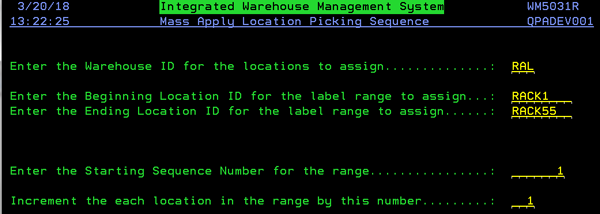
In this example:
- The range of locations we are working with is RACK1 through RACK55. Anything between these locations will be included.
- The starting sequence number is 1. Therefore, RACK1 is assigned a putaway sequence of 1. In this example, this location will receive the highest priority from directed putaway. Maybe RACK1 is closer to the receiving area than RACK55 and therefore is easier and faster to get to.
- Since each location, in this example, is incremented by 1, RACK55 is assigned a putaway sequence of 55. This means that before IWMS directs inventory to be located there it will look at 54 other locations first to see if they are usable.
IWMS records almost all functions (i.e., changing locations, changing quantities, receiving orders) onto a task history log. This provides you with a history of your warehouse activities.
These Task Codes are found on the Task Log Code Cross-Reference File:
- RECVADJUST - Adjustment Made During Receiving
- TIMEREND - Inbound Dock Door Timer Stopped
- TIMERSTR- Inbound Dock Door Timer Started
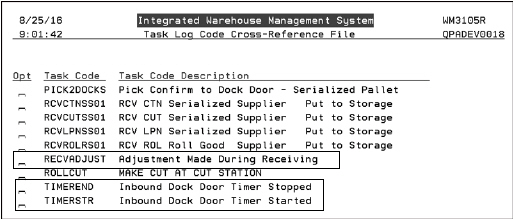
The Task Log Code Cross-Reference File cross references system generated task codes, some of which may not be obvious to understand on the Task History log, to a description that you create. If a system generated task code is cross referenced, the customer supplied description is used on the Task History Log.
To look at the details of one of the new codes, select it by entering an X in its Opt field.

The Customer Task Code is written to the Task History Log and the Description helps to identify the code.
If the setting Misc. Task Menu Item is activated, the task appears on the RF gun when option 72 - Misc. Tasks is selected on the RF menu.
If task codes and descriptions are changed, you can use F11 to view the original task code and descriptions.
Work With Job Code Definition File (WM8 41)
Work with Ship Date to Production Date Adjustments - WM8 51
Configure Door Bar Graph Settings - WM8 101
Work with Web drop-down fields - WM8 102
Set Work Queue Scope Definitions - WM8 103
Picking Workflow Code Maintenance - WM8 104
This program contains four settings that provide access and set defaults to parts of IWMS.
Access the program via menu option WM8 105 - User Settings.
Enter a U to update a user's settings.
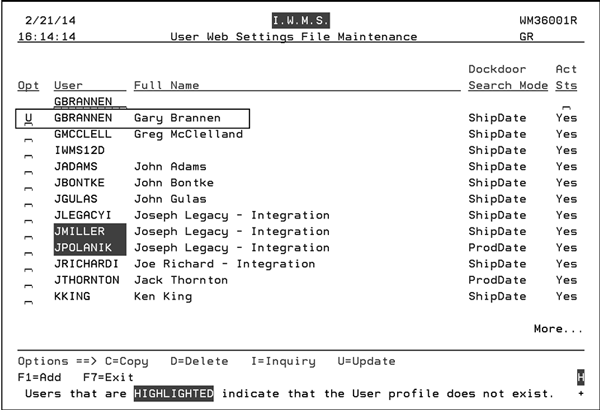
Press Enter to access the following screen. Make the necessary entries.
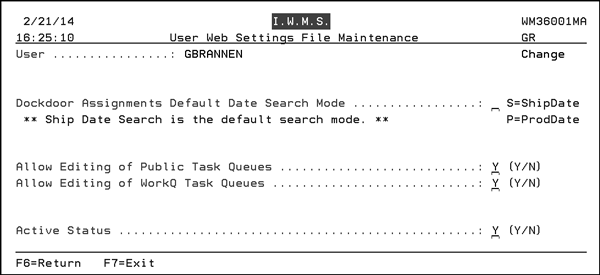
- Dockdoor Assignments Default Date Search Mode - The Dockdoor Search Mode can either be by actual shipping date (ship date) or the date the material was picked/or needs to be picked (production date). This setting ties into the Dock Door tab of the IWMS website. For more information, refer to Dockdoor Assignments.
- Allow Editing of Public Task Queues - Public task Queues are found on the Task Queue Manager tab of the web based portion of IWMS. They are open for everyone's use and if this field is activated, with a Y, this user has the ability to edit them. For more information, refer to Creating a New Search.
- Allow Editing of WorkQ Task Queues - Private task Queues are found on the Task Queue Manager tab of the web based portion of IWMS. They can only be used by the person who created them or those he has granted permission to. For more information, refer to WorkQueues.
- Active Status - Entering an N in this field essentially drops this user from IWMS and disallows future use.
